How LED Strip Lights Work: Power, Circuits & LEDs Explained
LED strip lights work by sending low-voltage DC power through a flexible circuit board lined with tiny LEDs, resistors, and copper traces. Each diode converts electricity into light, while the strip layout makes the whole system easy to cut, mount, dim, and control.
That basic setup supports everything from warm white under-cabinet lighting to RGB accent setups with app control and animated effects. This guide explains the core technology, the electrical behavior, and the practical design features that make LED strip lights work in real installations.
Quick Answer
LED strip lights use small semiconductor diodes mounted on a flexible circuit board. A power supply feeds the strip with low-voltage DC electricity, resistors regulate current, and controllers adjust brightness or color when needed.
- Each LED converts electrical energy into visible light
- Copper traces carry power along the length of the strip
- Resistors protect the LEDs from excess current
- Controllers manage dimming, colors, and effects
- Cut points let you shorten the strip without ruining the rest

Table of Contents
- Quick Answer
- The Semiconductor Foundation
- Strip Anatomy and Structure
- Electrical Principles Behind Operation
- Component Interaction
- Light Production Mechanism
- Color Generation Methods
- Power Requirements and Distribution
- Control Systems Explained
- Adhesive Backing Technology
- Heat Management Systems
- Cutting and Reconnecting Points
- Dimming Mechanisms
- Waterproofing Methods
- Key Takeaways
- Sharing this guide
The Semiconductor Foundation
The basic explanation starts with the diode itself. Each LED is a semiconductor device that turns electrical energy directly into visible light through a process called electroluminescence. If you want the broader theory behind that process, it helps to first understand how LED lighting works in general.
Inside each diode are two semiconductor layers with different electrical properties. When voltage is applied, electrons move across the junction and recombine with holes, releasing energy as photons. The materials used in that junction determine the wavelength, which is why different LEDs produce different colors.
White and blue LEDs often rely on gallium nitride-based materials, while red LEDs use different compound semiconductors. That material choice affects color output, efficiency, and long-term stability, which is why strip quality can vary so much from one product to another.
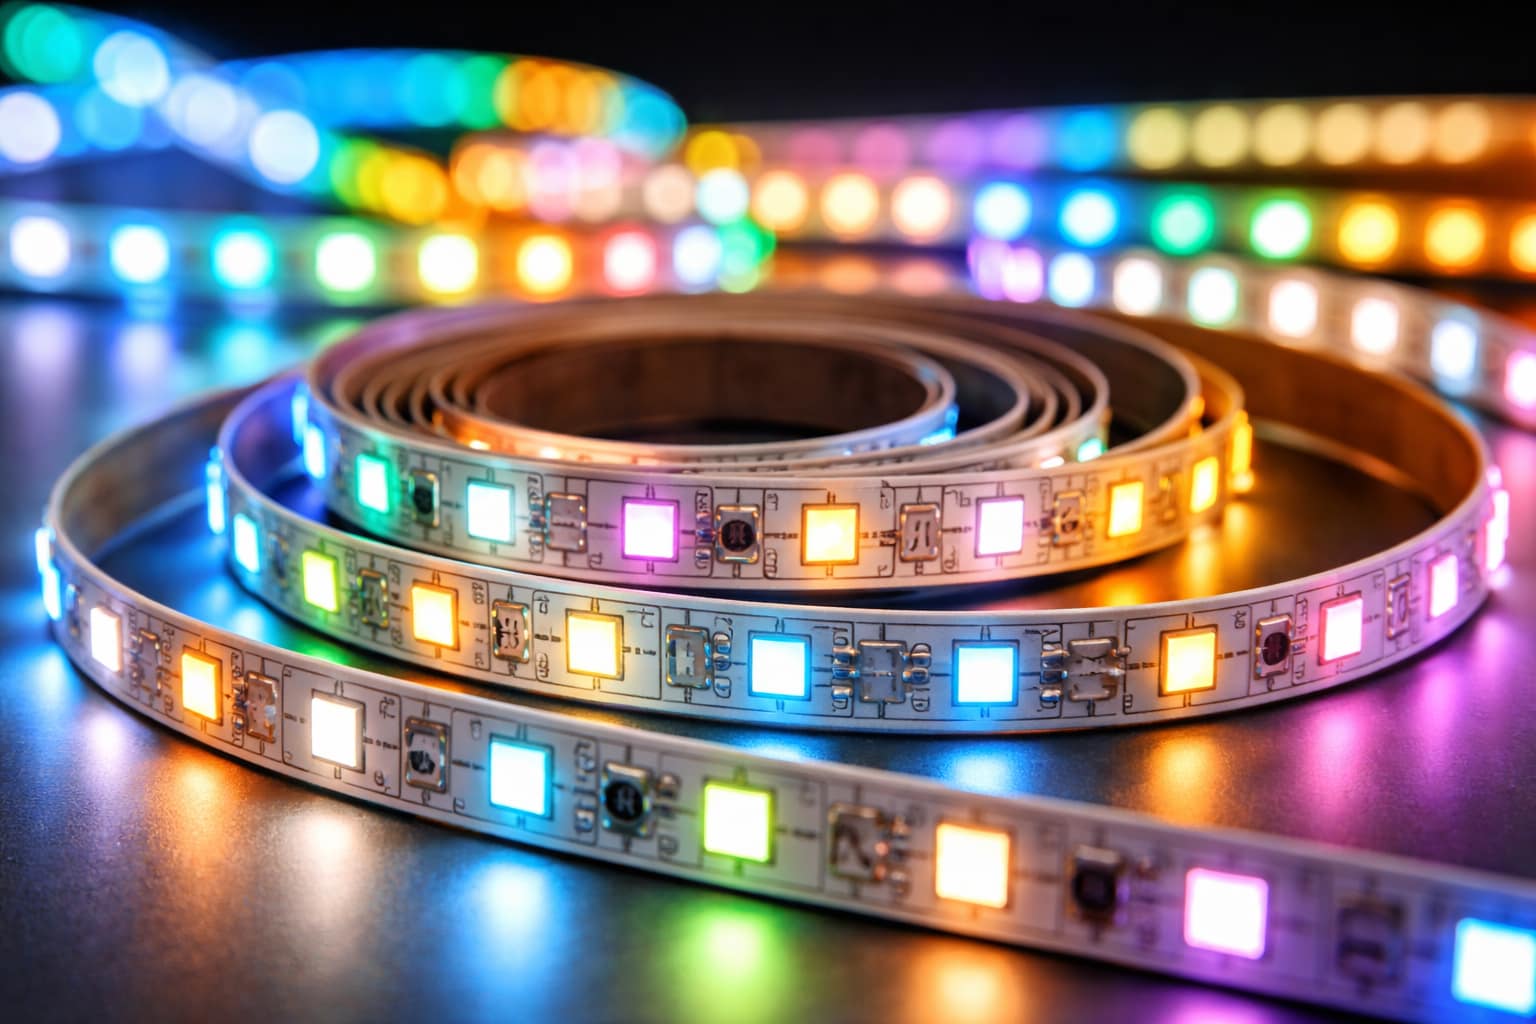
Strip Anatomy and Structure
To understand how the light, power, and controls all come together, it helps to look at the strip itself. An LED strip is not just a row of tiny lights on tape. It is a flexible circuit made up of copper traces, resistors, cut points, and repeating LED segments.
Flexible Base Material
The base is usually a flexible printed circuit board made from copper laminated to a polymer substrate. It supports the components, carries current, and lets the strip bend around cabinets, shelves, and curves without breaking the circuit. Looking at different strip types makes it easier to see why some products bend better or handle heat more effectively than others.
That board also contains positive and negative copper traces running the full length of the strip. Those traces must carry current efficiently, because extra resistance leads to voltage drop and uneven brightness on longer runs. If you want a simpler starting point, a complete LED strip light kit with a controller and power supply can make component matching much easier.
Component Placement Pattern
LED strip components are arranged in repeating electrical segments along the board. Each segment usually contains multiple diodes and at least one resistor, which is why the strip can be cut only at marked points without destroying the rest of the circuit.
LED density also changes how the finished lighting looks. Strips with more LEDs per meter create smoother, more continuous illumination, while lower-density strips show more visible points of light. If brightness and spacing matter to your project, this guide to brightness levels and density helps explain the difference.
Electrical Principles Behind Operation
Most LED strip lights run on low-voltage DC power, usually 12V or 24V, so they need a power supply to convert household AC electricity into usable DC output. That lower operating voltage makes the system easier to work with and safer for many home, vehicle, and display applications. If you are comparing options, this guide to voltage differences in strips explains why 5V, 12V, and 24V setups behave differently.
Inside the strip, current flows through small repeated groups of LEDs and resistors. The resistors limit current to protect the diode junctions, since LEDs cannot safely regulate current on their own. That is one of the main reasons the strip lights evenly instead of burning out almost immediately.
The whole system follows the normal relationship between voltage, current, and resistance. If you want a more beginner-friendly overview, our guide to basic LED strip principles covers the essentials without getting too technical.
Component Interaction
Several small parts have to work together for a strip to light evenly and last over time. The resistors, diode groupings, and circuit layout all affect brightness stability, heat, and fault tolerance.
Resistor Function in Circuits
Surface-mount resistors are critical to the way LED strips operate. These tiny components protect each diode group from current spikes that would otherwise cause immediate failure. Their values are selected based on the input voltage and the number of diodes in that segment.
Without proper resistance, even small voltage increases can push too much current through the semiconductor junctions, creating excess heat and rapid degradation. Better strips use stable components that keep performance more consistent across changing temperatures and load conditions.
Series and Parallel Configurations
Most strips use a hybrid layout with small series strings connected in parallel along the length. Series connections combine the forward voltages of the LEDs in each segment, while the parallel arrangement lets the whole strip continue operating across many repeated sections.
This design makes the strip more practical to use. If one section fails, only part of the strip usually goes dark rather than the entire run. It also spreads heat and electrical load more evenly across the board, which helps reliability over time.
Light Production Mechanism
The actual light generation happens inside the semiconductor junction. As electrons recombine with holes in the active region, they drop to lower energy states and release that energy as photons. The semiconductor bandgap determines the wavelength of those photons, which sets the color of the emitted light.
This process is far more efficient than producing light with a heated filament. Incandescent bulbs waste most of their energy as heat, while modern LEDs convert a much larger share into visible light. They still produce heat, but much less than older lighting technologies.
Color consistency depends heavily on manufacturing quality. Better chips have more uniform semiconductor structures, which leads to steadier color output and more predictable long-term performance. According to the U.S. Department of Energy, that efficiency and consistency are major reasons LEDs are so widely used today.
Color Generation Methods
The way a strip produces one color or many colors depends on the type of LEDs mounted on it. Single-color strips and RGB strips follow the same basic electrical principles, but they differ in how the diodes are arranged and controlled.
Single Color Implementation
Single-color strips are the simplest version of LED strip lighting. In white strips, the LEDs usually start as blue chips coated with phosphor. That phosphor absorbs part of the blue light and re-emits longer wavelengths, which your eyes interpret as white light.
The exact phosphor mix affects color temperature. Warm white strips produce a softer, more yellow-toned light, while cool white strips look crisper and more energetic. That is why two white strips can feel very different even when their brightness seems similar.
RGB Technology Integration
RGB strips add more complexity by placing red, green, and blue LEDs together within each section. A controller adjusts the intensity of each channel, and those three colors mix to create a wide range of shades. If you want a closer look at more advanced color control, this guide to RGB vs RGBIC differences breaks down what changes from one strip type to another.
Because each channel needs separate control, RGB strips require more copper traces and more wiring than single-color versions. A stable power source also matters more, especially when brightness changes quickly. If your setup suffers from inconsistent output, a regulated 12V LED driver with constant-voltage output can help keep performance steadier.
Power Requirements and Distribution
Power planning is one of the most practical parts of understanding how LED strip lights work. Every strip has a wattage draw per meter or per foot, and the full run determines the size of the power supply you need. For example, a strip rated at 4.8 watts per meter will need about 24 watts for a 5-meter run, before adding any safety headroom.
Power supply choice affects both performance and lifespan. An undersized unit may run too hot, struggle with brightness consistency, or fail early. If you need broader buying guidance, our LED lighting buying guide is a good place to start.
Choose a power supply with some headroom above the strip’s calculated wattage, especially for long runs or enclosed installations. That extra margin helps keep temperatures down and improves long-term reliability.
Voltage drop becomes more noticeable as runs get longer. Because the copper traces have resistance, the far end of the strip may receive less voltage and appear dimmer. That is why longer installations often need power injection at multiple points instead of feeding everything from one end.
Control Systems Explained
Controllers sit between the power supply and the strip, shaping how the LEDs behave. Some setups only need basic brightness control, while others support color scenes, schedules, voice commands, or addressable effects.
Basic Controllers
Simple controllers manage brightness by adjusting how power reaches the strip. Many use pulse-width modulation, or PWM, which rapidly switches power on and off at a speed your eyes cannot normally detect. The longer the on-time compared with the off-time, the brighter the strip appears.
PWM is popular because it keeps the LEDs running at full voltage during each on-cycle, which helps maintain more stable color characteristics across the dimming range. That makes it more reliable than crude voltage reduction in many everyday installations.
Smart Integration Options
More advanced controllers add WiFi, Bluetooth, or smart home integration. These systems let you adjust brightness, colors, and effects from a phone or voice assistant, and they can often be tied to timers, routines, and automation platforms.
Some controllers can even address individual LED sections instead of treating the whole strip as a single output. That is what makes moving patterns, segmented color effects, and dynamic animations possible on addressable strips.
Adhesive Backing Technology
Most LED strips include adhesive backing so they can be mounted quickly to clean, smooth surfaces. The adhesive is usually pressure-sensitive and sticks best when the surface is dry, dust-free, and free from oils or residue.
Adhesive alone is not always enough for demanding installations. Heat, moisture, rough surfaces, and upside-down placement can all weaken the bond over time. That is why aluminum channels or clips are often used in more permanent setups, especially where appearance and durability matter.
Heat Management Systems
LED strip lights run cooler than incandescent lighting, but they still produce heat that needs to be managed. If that heat builds up around the diode junctions, light output slowly drops and component life shortens.
The circuit board helps spread some of that heat, but mounting the strip to a thermally conductive surface improves things even more. Aluminum channels are especially useful because they support the strip physically, improve heat transfer, and often create a cleaner finished look. If you want a practical upgrade, an aluminum channel for mounting and diffusing LED strip runs can improve both appearance and long-term stability.
Temperature also affects immediate performance. Excess heat can shift electrical behavior, reduce efficiency, and sometimes alter color appearance. Keeping the strip within its intended thermal range is one of the easiest ways to protect brightness and lifespan.
Cutting and Reconnecting Points
LED strips are designed to be customized. Printed cut marks appear at regular intervals, usually where copper pads are exposed, so you can shorten the strip without breaking the rest of the circuit. Those marks correspond to the electrical segment layout built into the strip.
Only cut at the marked points. Cutting through an active segment can permanently damage that section and make reconnection much harder.
To reconnect sections, you can either solder wires to the exposed pads or use clip-style connectors. Soldering usually gives the most secure electrical and mechanical connection, while connectors are faster and easier for beginners. Both can work well when matched to the strip width and installed carefully.
Dimming Mechanisms
Dimming is one of the features that makes LED strips so flexible in real-world use. In most cases, brightness is controlled through PWM, which changes the proportion of time the LEDs stay on during each switching cycle. That allows the strip to look dimmer without changing the basic operating voltage during each pulse.
Some systems use analog dimming instead by lowering current, but that can lead to color shifts or less even control, especially on RGB strips. PWM avoids most of those issues, which is why it remains the most common approach in consumer and professional strip lighting.
Controller quality matters here too. Better controllers provide smoother transitions, finer low-end control, and less visible stepping when brightness changes. That becomes especially noticeable in bedrooms, accent lighting, or media setups where subtle dimming matters.
Waterproofing Methods
Waterproofing changes how LED strips are built for outdoor or moisture-prone use. Ratings such as IP65, IP67, and IP68 indicate how well the strip resists dust and water. If you need help comparing those protection levels, our guide to IP ratings for LED strips explains what each one actually means in practice.
Many waterproof strips use a silicone coating or sleeve to protect the circuit and LEDs while still allowing light to pass through. That protection improves durability in damp conditions, but it also makes the strip thicker and sometimes a little less flexible.
There is also a thermal tradeoff. Waterproof layers can trap more heat, which means enclosed fixtures and high-power outdoor runs need extra care. In other words, water resistance improves durability in wet spaces, but good heat management still matters if you want the strip to last.
Key Takeaways
LED strip lights work by sending low-voltage DC power through a flexible circuit board where small diode groups and resistors convert electricity into visible light. Once you understand that structure, features like color control, dimming, cut points, and waterproofing become much easier to understand.
For reliable results, match the strip voltage to the correct power supply, leave some wattage headroom, and plan for voltage drop on longer runs. Installation details such as surface prep, connector quality, and heat management matter almost as much as the LEDs themselves.
Whether you are building simple accent lighting or a more advanced RGB setup, knowing how LED strip lights work helps you choose better components and avoid common mistakes. That usually leads to cleaner installs, steadier performance, and a longer-lasting lighting system.
Sharing this guide
If you found this guide useful, you can save it for later or send it to someone planning a strip lighting project. It is especially helpful for beginners, homeowners, and DIY users.
Share using the links below
Interested in learning more? Browse all related articles in our LED knowledge center for deeper guides and tutorials.