LED Driver Failure: Critical Signs and Solutions
When your lighting system starts behaving unpredictably, the culprit is often hidden inside a small metal box. Understanding LED driver failure can save you time, money, and frustration. This comprehensive guide walks you through the critical signs, root causes, and proven solutions to restore reliable performance.
Whether you manage commercial installations or troubleshoot home projects, recognizing power supply problems early prevents costly replacements and safety hazards down the road.

Table of Contents
- Understanding the basics
- Common symptoms you should recognize
- Flickering and dimming patterns
- Complete shutdowns and restarts
- Overheating signs and thermal damage
- Root causes behind component breakdown
- Voltage mismatch and current overload
- Environmental stress factors
- Diagnostic techniques for accurate testing
- Multimeter testing procedures
- Visual inspection methods
- Replacement strategies and best practices
- Preventive maintenance for longevity
- Installation errors to avoid
- Sharing this guide
Understanding the basics
Power conversion components serve as the heart of modern lighting systems. These devices transform standard household electricity into the precise voltage and current required by semiconductor diodes. Without proper regulation, even premium chips burn out within seconds.
Most residential setups use constant voltage units rated at twelve or twenty-four volts. Commercial installations often prefer constant current designs that maintain steady amperage regardless of load variations. Both types face similar stress factors, though their failure modes differ slightly.
The internal architecture includes rectifiers, capacitors, transformers, and control circuits. Each component plays a specific role in maintaining clean, stable output. When one element degrades, the entire chain suffers. LED power supply troubleshooting begins with understanding this interdependence.
Common symptoms you should recognize
Early detection relies on noticing behavioral changes before complete shutdown occurs. Intermittent operation tops the list of warning signs. Lights that turn on reliably but shut off after twenty minutes indicate thermal protection circuits engaging repeatedly.
Another telltale pattern involves random restarts without user intervention. This behavior suggests voltage regulation instability or capacitor degradation. If you want a dependable option, a solid example is Klein Tools MM325 Multimeter, Digital Manual-Ranging 600V AC/DC Voltage Tester, Tests Batteries, Current, Resistance, Diodes, and Continuity, which is known for stable long-term performance.
Audible clues also reveal internal distress. High-pitched whining or buzzing sounds emerge from stressed inductors and transformers. These noises often precede complete LED driver failure by several weeks, giving you time to plan replacements.
Flickering and dimming patterns
Rapid brightness fluctuations signal ripple voltage problems. Healthy units filter alternating current completely, delivering smooth direct current. When electrolytic capacitors dry out, residual AC ripple passes through to the chips, causing visible strobing effects.
Gradual dimming over time suggests current output decay. This LED power supply troubleshooting scenario often stems from aging components losing efficiency. The unit continues operating but delivers insufficient power to maintain full brightness across all fixtures.
Environmental factors accelerate capacitor aging. High ambient temperatures evaporate electrolyte faster, reducing lifespan from fifty thousand hours to fifteen thousand in poorly ventilated enclosures. Proper avoiding common wiring errors helps minimize thermal stress.
Complete shutdowns and restarts
Protection circuits built into modern units prevent catastrophic damage by shutting down when abnormal conditions arise. Overvoltage, overcurrent, and overtemperature protection all trigger automatic disconnection. The system attempts to restart once conditions normalize.
Cycling behavior indicates borderline operating conditions. The faulty LED transformer provides just enough output to power up, then trips protection as load increases. This pattern repeats endlessly until root causes receive attention.
Cold weather can trigger shutdowns in outdoor installations. Capacitors exhibit higher impedance at low temperatures, reducing available current. Units rated for extended temperature ranges cost more upfront but prevent seasonal LED power supply troubleshooting headaches.
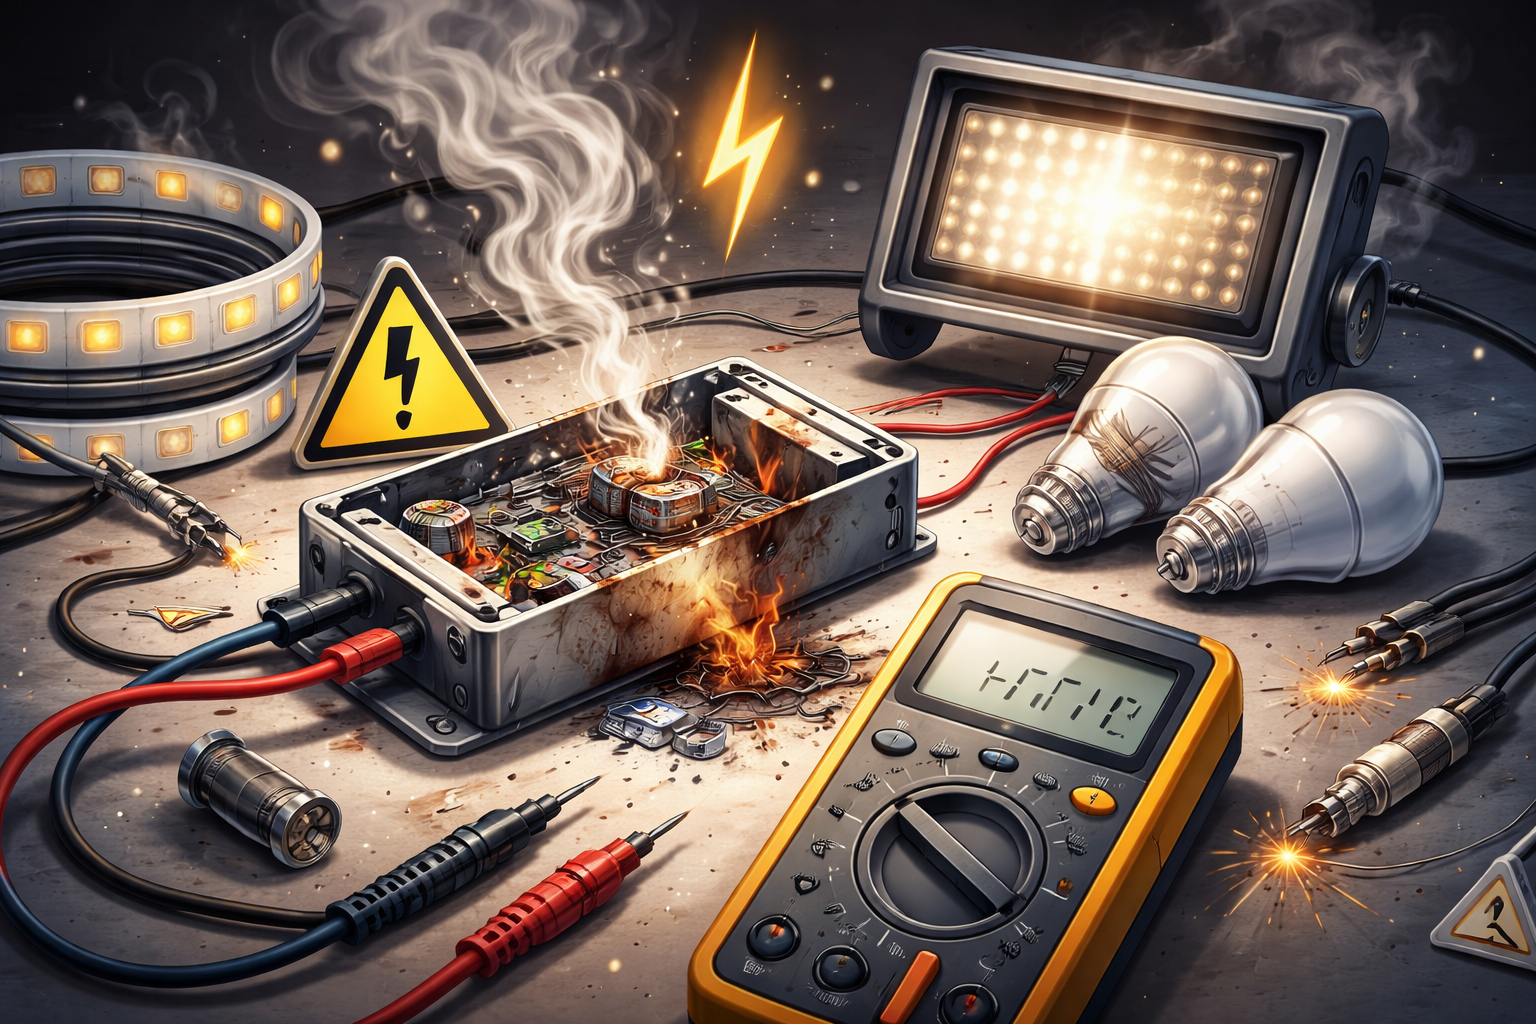
Overheating signs and thermal damage
Excessive heat generation indicates efficiency loss or inadequate cooling. Aluminum housings should feel warm but never too hot to touch comfortably. Surface temperatures exceeding sixty degrees Celsius warrant immediate investigation.
Discoloration around ventilation slots reveals chronic driver overheating issues. Yellowed plastic and scorched labels appear near failing components. Opening the case might expose bulging capacitors or darkened circuit boards, confirming thermal damage.
Another practical alternative is Armacost Lighting 60-Watt Universal Dimmable 12V DC LED Driver TRIAC 840600, which performs reliably in everyday use.
Root causes behind component breakdown
Multiple factors contribute to premature degradation. Understanding these mechanisms helps prevent recurrence after replacement. Manufacturing quality varies dramatically between brands, with budget models using marginal components rated at minimum specifications.
Electrical stress from power surges and voltage spikes damages semiconductors gradually. Each transient event weakens insulation and junction integrity. Accumulated damage eventually causes LED driver failure even if no single event seemed severe.
According to the U.S. Department of Energy, proper power quality significantly extends lighting system lifespan. Installing surge protection at the panel level provides whole-system defense against utility transients.
Voltage mismatch and current overload
Connecting incorrect loads guarantees rapid deterioration. A sixty-watt unit powering eighty watts of fixtures operates in constant overload. Output transistors overheat, solder joints crack, and the faulty LED transformer enters a death spiral.
Input voltage variations also create problems. Units designed for North American 120V mains struggle when fed 110V from generators or distant transformers. Conversely, sustained overvoltage stresses input rectifiers and filter capacitors unnecessarily.
Parallel connection mistakes multiply current draw beyond rated capacity. Each strip or module adds load, and exceeding nameplate ratings accelerates LED power supply troubleshooting needs. Always verify total wattage before energizing new installations.
Environmental stress factors
Humidity infiltration corrodes internal traces and component leads. Outdoor enclosures require IP65 or higher protection ratings to exclude moisture. Even indoor installations in bathrooms and kitchens benefit from conformal coating on circuit boards.
Dust accumulation blocks ventilation openings, trapping heat inside metal cases. Regular cleaning extends service life significantly. Industrial environments with metal particulates or chemical vapors demand specialty housings to prevent contamination.
Vibration from nearby machinery loosens solder connections over time. Automotive and marine applications face constant mechanical stress requiring potted or ruggedized designs. Standard units fail prematurely when subjected to sustained driver overheating issues from poor mounting locations.
Diagnostic techniques for accurate testing
Systematic troubleshooting separates power supply problems from fixture defects. Begin by isolating the suspected unit from all loads. Measure output voltage with nothing connected to verify regulation under no-load conditions.
Next, reconnect half the normal load and monitor voltage stability. A healthy unit maintains rated output within five percent regardless of loading. Significant voltage sag indicates internal resistance from failing components or poor solder joints.
Temperature monitoring during operation reveals thermal management deficiencies. Infrared thermometers identify hot spots invisible to naked eyes. Consistent readings above eighty degrees Celsius on aluminum housings confirm inadequate heat dissipation contributing to LED driver failure.
Multimeter testing procedures
Digital meters provide precise measurements essential for LED power supply troubleshooting. Set the device to DC volts and probe output terminals with the unit energized but unloaded. Compare readings against nameplate specifications printed on the housing.
Current measurement requires breaking the circuit and inserting the meter in series. Most installations make this impractical, so indirect methods work better. Calculate current by dividing total wattage by output voltage, then verify actual power consumption matches expectations.
Resistance checks on disconnected units reveal shorted outputs or open circuits. Infinite resistance suggests broken traces, while near-zero readings indicate catastrophic semiconductor failure. Understanding why new installations fail to illuminate often involves these basic measurements.
Visual inspection methods
External examination starts with checking all wire connections. Loose terminals create arcing and heat buildup. Tighten every screw terminal and inspect crimp connections for corrosion or strand breakage.
Opening the case requires caution due to residual charge in capacitors. After disconnecting power, wait five minutes before touching internal components. Look for burn marks, cracked solder joints, or components with visible damage indicating the faulty LED transformer location.
Capacitors near heat sinks often bulge at the top when electrolyte evaporates. This telltale sign confirms replacement necessity. Circuit boards with darkened areas around power transistors reveal chronic driver overheating issues requiring better thermal management.
Replacement strategies and best practices
Selecting suitable alternatives requires matching critical specifications. Output voltage must align exactly with fixture requirements. A twelve-volt strip connected to twenty-four volts destroys chips instantly, while underpowering causes dim operation and premature aging.
Wattage capacity should exceed total load by at least twenty percent. This safety margin prevents continuous operation at maximum rating, reducing component stress. Units running at eighty percent capacity last significantly longer than those pushed to their limits.
For a more permanent upgrade, many users switch to Klein Tools IR1 Infrared Thermometer, Digital Laser Gun is Non-Contact Thermometer with a Temperature Range -4 to 752-Degree Fahrenheit, which offers consistent results over time.
Preventive maintenance for longevity
Regular cleaning removes dust buildup that impedes airflow. Schedule quarterly inspections for commercial installations and annual checks for residential systems. Vacuum ventilation slots and wipe housings with dry cloths to maintain thermal performance.
Monitoring ambient temperature helps predict service intervals. Locations exceeding forty degrees Celsius require derating or enhanced cooling. Installing small fans near enclosed units significantly reduces internal temperatures, preventing premature LED driver failure.
Keep detailed records of installation dates and operating hours. Most quality units provide thirty to fifty thousand hours of service. Proactive replacement before complete failure prevents unexpected downtime and allows scheduled maintenance windows. Exploring modern smart lighting options offers additional monitoring capabilities.
Installation errors to avoid
Mounting units directly against combustible surfaces violates electrical codes and creates fire hazards. Maintain minimum clearances specified in installation instructions, typically one inch on all sides for natural convection cooling.
Running output wiring in the same conduit as high-voltage circuits induces interference. Separate low-voltage runs by at least six inches from mains cables. Use shielded wire when crossing unavoidable proximity points to prevent LED power supply troubleshooting from electromagnetic interference.
Incorrect polarity damages some units instantly. Double-check positive and negative connections before applying power. Mark wires clearly during installation to prevent reversal during future maintenance. Reviewing comprehensive resources at the knowledge center for troubleshooting tips prevents common mistakes.
Sharing this guide
If you found this guide helpful, you can save it for later or share it with a friend. It’s especially useful for beginners, homeowners, and DIY users.
Share using the links below
Interested in learning more? Browse all related articles in our category section.
Pingback: LED Lighting Efficiency Explained: Simple Truth - NeoLEDHub
Pingback: Constant Current vs Constant Voltage: Critical - NeoLEDHub